The Good Guys Signs Vinyl Selection Framework
Authored by Tom Tucky | Updated May 2026
Choosing the right vinyl shouldn't be guesswork. Most failures in vinyl graphics don't come from printing; they come from using the wrong material for the surface, environment, or application. This framework is how we’ve approached material selection across thousands of jobs, from simple signage to large-scale production runs. Material selection is ultimately a risk-management decision as much as a print decision.
Step 1: Start with the Type of Surface and its Shape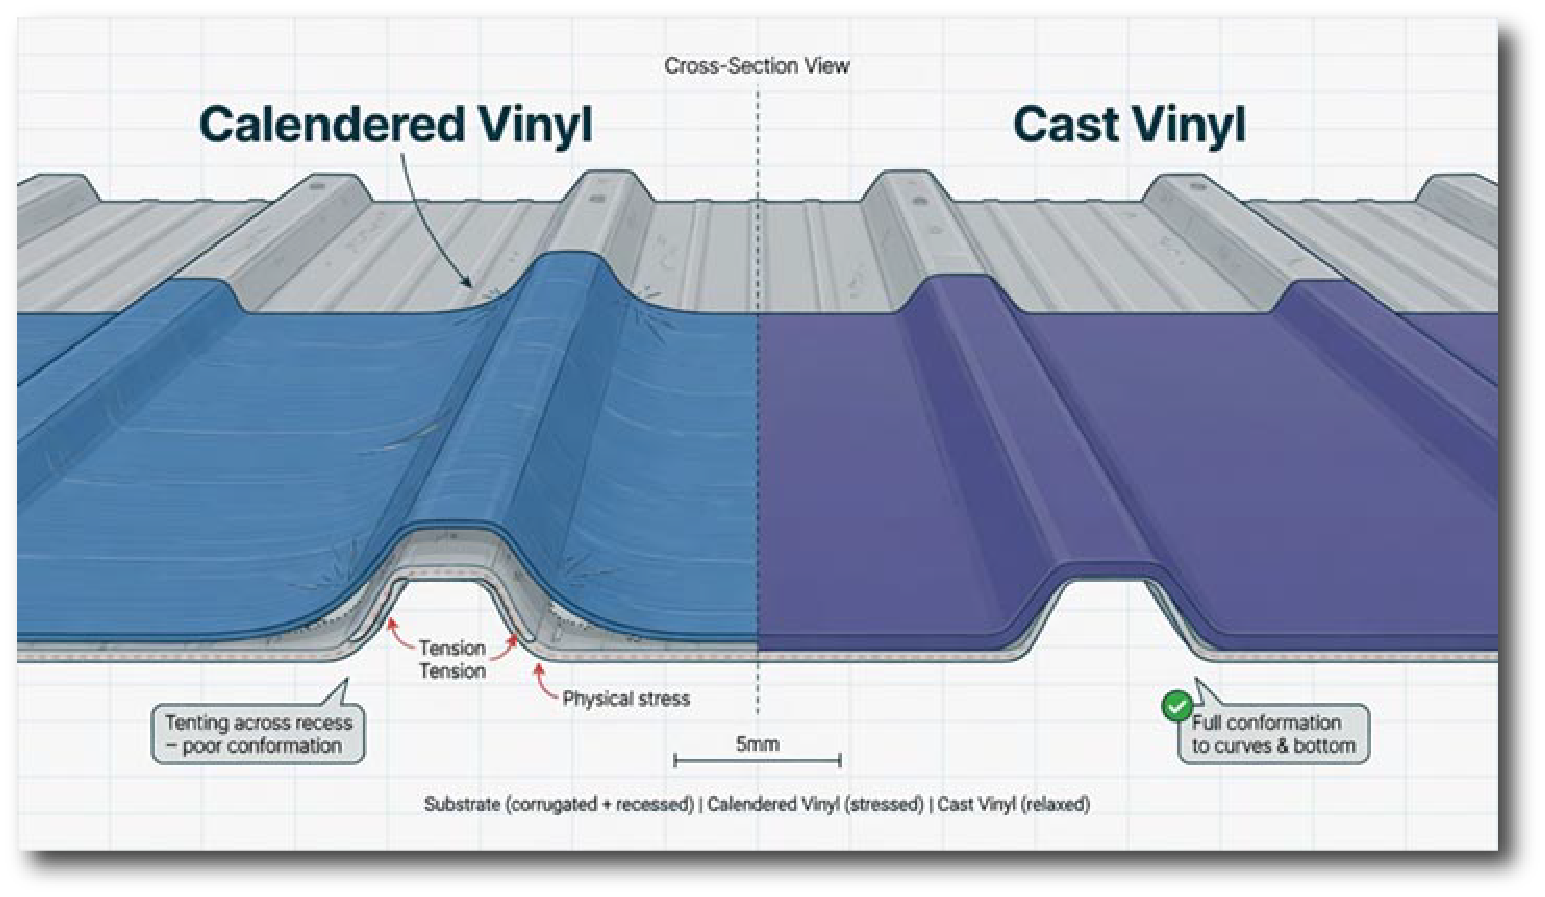
The surface determines much.
- Flat surfaces: Use calendered vinyl. Workhorse materials like 3M IJ39, Oracal 3640, and 3M IJ40 are excellent, cost-effective choices here.
- Curved, contoured, or recessed surfaces: Use conformable cast vinyl like 3M IJ180 or 3M IJ175.
- Metallic/Ceramic Surfaces: Metallic and ceramic surfaces absorb and radiate intense heat. This thermal cycling accelerates chemical breakdown, often causing economy vinyls and economy adhesives to fail rapidly.
Step 2: Understand the Environment & Performance Demands
Where the graphic lives dictates the best material choice. A film engineered for a climate-controlled room can quickly fail if exposed to the elements or industrial stress. Over-specifying material wastes money. Under-specifying it creates failure.
- Temporary vs. Permanent Applications: When a graphic needs to be removed, a vinyl with removable adhesive must be chosen. Wrap and low-tack vinyls are preferred for ease of removal. The desired lifespan of the graphic directly impacts material selection.
- Indoor vs. Outdoor: Outdoor graphics require dimensionally stable films and UV-blocking overlaminates to survive thermal expansion, moisture, and sun degradation. Cost-effective films are best suited for stable indoor environments or very short-term outdoor use.
- Demanding Exposure: High-stress applications—such as those involving industrial chemicals, heavy wear, or tension—require high-performance cast materials to prevent rapid adhesive breakdown.
- Difficult Substrates: Use LSE (Low Surface Energy) adhesives to form a permanent bond on hard-to-stick plastics and powder-coated metals.
- Textured Surfaces: Use high-tack adhesives to grip porous or uneven substrates like brick or stucco.
- Graphic Overlays: Use blockout grey adhesives to completely hide existing prints or brightly colored surfaces underneath.
- Gloss/Matte preference: Often this preference is dealt with by the choice of over-laminate.
Step 3: Installation Mechanics
Installation is where a good print can go wrong immediately. While Step 2 covers environmental chemistry and behavior, this step covers the physical mechanics of application.
Economy vinyl can resist positioning, trap air, and slow down installs. When economy vinyl accidentally touches a surface, it often distorts when being removed or repositioned.
Higher-quality films utilize adhesives with air channels, which allow them to install cleaner, reposition more easily, and reduce failure during application. Premium films allow controlled repositioning during installation, reducing wrinkles, distortion, and trapped air.
If installation speed and consistency matter, avoid the lowest-tier materials.
Step 4: Production Volume & Physical Dimensions
At small quantities, most materials appear to work. However, as the physical footprint of the graphic or the volume of the production run increases, small inconsistencies become large problems. Scale impacts the project in three distinct ways: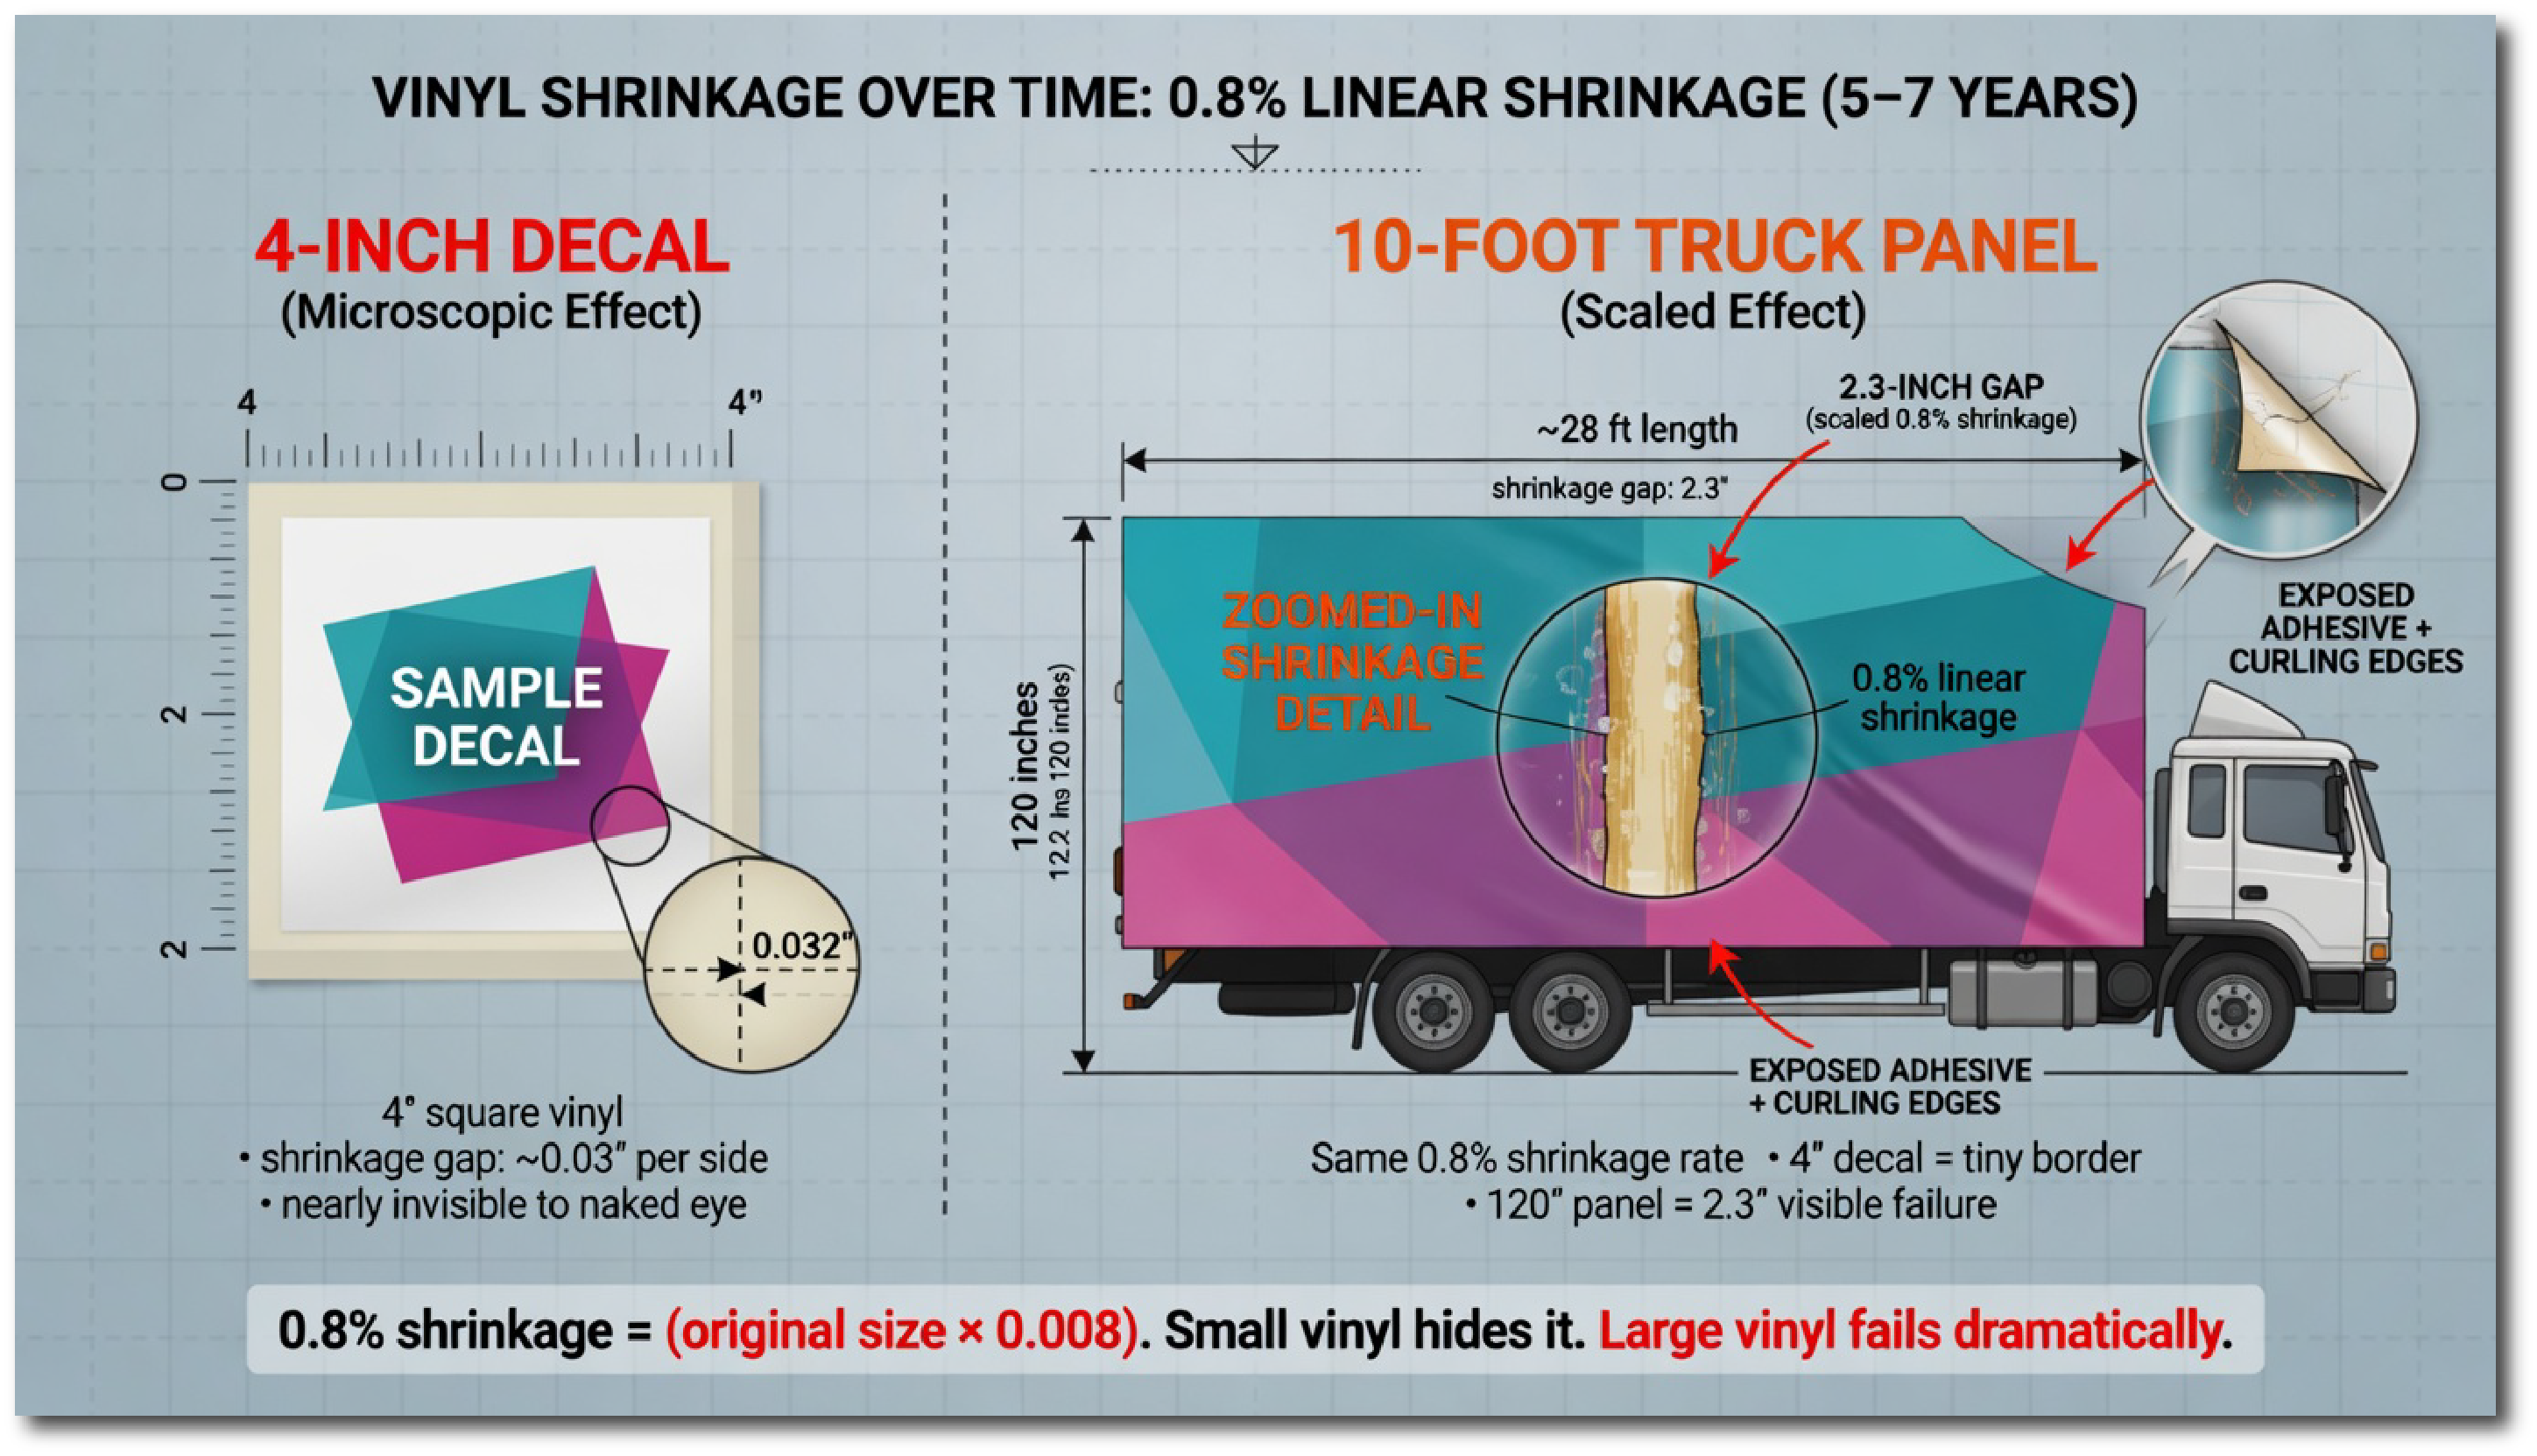
- Decal Size & Material Shrinkage: The physical dimensions of the graphic dictate material requirements. Calendered films have an inherent "memory" from their manufacturing process and will slowly shrink over time. On a small 4-inch decal, this shrinkage is practically invisible. On a massive 10-foot panel, that same percentage of shrinkage translates into severe panel gaps, edge curl, and exposed adhesive. Installing large graphics requires dimensionally stable cast films that are manufactured in a relaxed state, preventing pullback.
- Installation Volume: Installation issues multiply across locations. A vinyl that takes five extra minutes to position is a minor annoyance on a single window, but it creates a massive labor drain when applied across a 50-vehicle fleet.
- Production Consistency: To guarantee perfect curing and color fidelity across massive, multi-roll production runs, it is vital to dial in specific media profiles for your large-format digital printers.
At production scale, consistency matters more than the initial cost.
The Simple Rules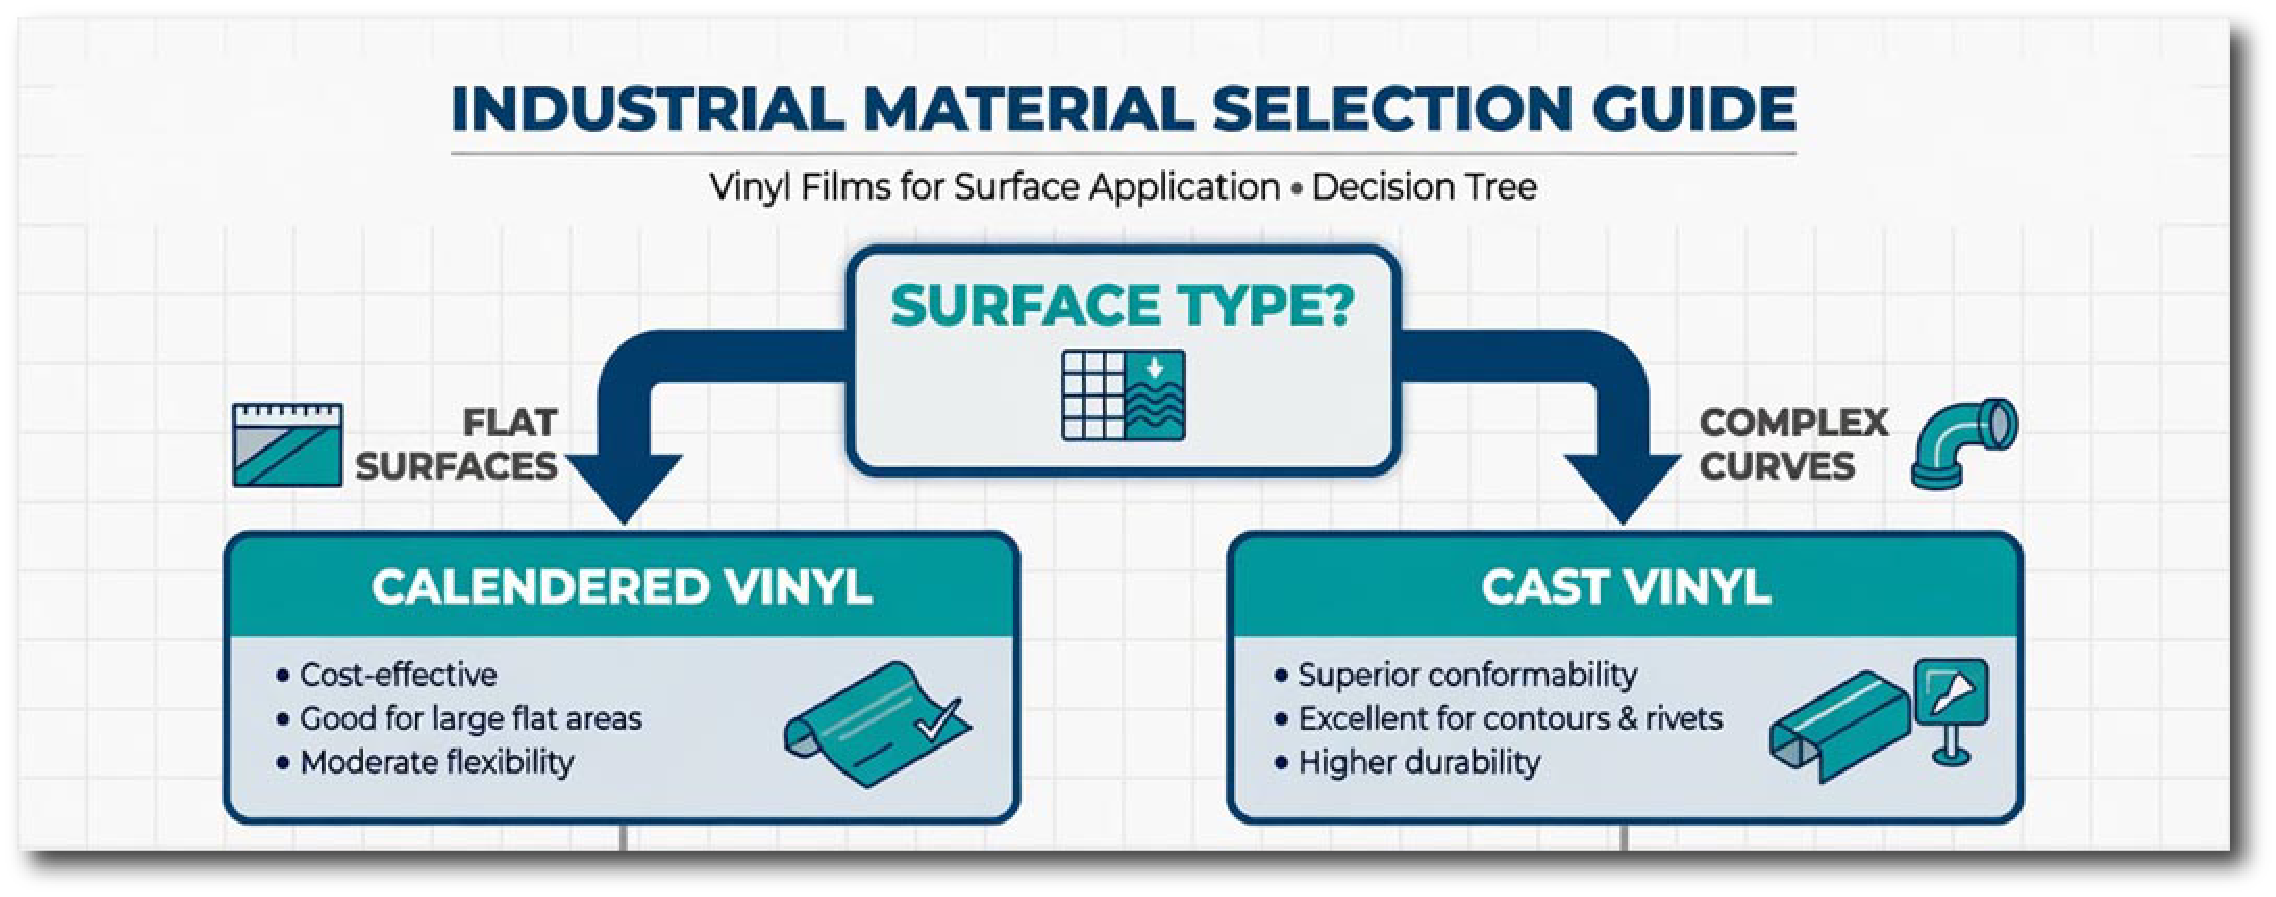
If you don't want to overthink it:
- If the surface is flat → use calendered vinyl
- If the surface has curves → use cast vinyl
- If installation matters → avoid economy materials
- If scale increases → consistency matters
What Happens When Material Is Chosen Incorrectly
Most vinyl failures trace back to material mismatches. Symptoms include:
- Edges lifting on curves
- Wrinkles during installation
- Adhesion failure in recessed areas
- Premature fading or breakdown outdoors
These issues are predictable and avoidable.
Our Approach
We don't default to one material. We match the vinyl to the surface, the project needs and environment, the installation method, and the scale of the project. This ensures the graphic installs cleanly, performs as expected, and holds up over time.
Final Thought
Printing is only part of the process. Choosing the right material is what determines whether the job succeeds or fails in the field.
 (800) 215-6424